
How to Make a Window Glass Repair
A bad storm or the ball of a child or even a lawnmowers could cause a crack to appear in your windowpane. Repairing the crack can be done quickly with a little effort. This will prevent it from growing until you are able to make it permanent.
Wearing eye protection, remove the sash and clean glazing and adhesive, as well as any other debris from the frame's interior. Take measurements of the opening to the nearest 1/16 inch.
Remove the Broken Pane
The first step to repair damaged window panes is to remove it from the frame. It is crucial to wear gloves and eye protection to complete this task due to the razor-sharp shards that will be found in the frame. It is best to remove one piece at a time, wagging it slowly and carefully so you don't break the remainder of the glass inside the frame. After you have all the shards taken away and disposed of properly, dispose them and keep some to take to the store in order to ensure that the glass you replace is in good shape.
Then, using a putty knife take care to cut around the edges of the frame in which the broken glass was. You may have to sand this area to get rid of any rough spots and smooth it. Then seal it using linseed or clear wood sealer.
If you have a double-paned windows it is also necessary to remove the vinyl stoppers around the frame's outside. If the window is opened, you can easily remove them by hand. They may become brittle from the sun, so it's recommended to get rid of them before they break.
The glazier points are small metal pins that keep the glass in place. They're usually hidden behind beads of putty. If you don't remove them and replace them with a new window, it could not be a good fit and may have a difficult to hold its shape over time.
Remove the old caulking putty with an utility knife. Make sure you get rid of it completely from all surfaces of the window frame. Use a heat gun if necessary to soften the putty making it less likely to be damaged by the paint underneath. It is possible to sand or scrape it to smooth it to allow for the new window.
Preparing the Frame
A home window is not complete without glass. It is a key component of a home window. It provides privacy, light, and regulates temperature and air circulation. It can be an security risk if it is not installed or maintained correctly. This is why it is crucial to address any issues with the frame or glass as soon as possible. This will ensure that your windows are working at their best and will also act as protected from insects, weather and intruders.
Make sure you have all the supplies you need before you begin any work. You'll be unable to finish a project halfway and find out that you're lacking the essential tool. It is also an excellent idea to have a second person on hand to assist you in the more difficult aspects of the task. They can offer additional support when lifting and moving the heavy window panes as well as helping to protect you from broken glass shards.
During the process of preparation it is crucial to make sure that there aren't any traces of glazing points or putty left in the rabbet groove. These can cause the window to not fit properly and will need to be removed prior to moving on. It is also important to ensure that the window's opening is at minimum 1/8 inch smaller than the glass you are replacing to allow expansion and contraction due to climate changes.
To prepare for the installation of the new window you'll require a coat of elastomeric caulk on the exposed side of the casings or stops on the outside of the frame. Apply a continuous caulk ring around the head jamb. You may require a caulking gun for this step.
It is now time to add new glazing points. They will have to be cut according to your specifications at a home center or hardware store. They should be slightly bigger than the rabbets on all sides to enable you to put them in place. You will have to roll the putty into a rope approximately 3-4 inches thick after the glazing points have been installed. Then, you'll need to press it against the edges of the sash and the frame in order to secure it.
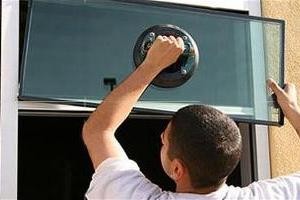
Installing the New Pane
A damaged window could expose your home to the elements. You must repair your window promptly to prevent shards of glass from being blown into your home by a baseball, or a strong wind. Whether you have a small crack or a large broken pane, there are several solutions to fix it. Depending on your needs, you may need to replace the entire window or just one.
If your window pane is still structurally intact, you can use braces made of plastic to hold the glass together until you are ready for an all-time solution. The trick is to find a piece of plastic that's strong enough to support the damaged glass and keep it from sliding. You could also try placing the paper inside the frame, but this won't provide the same level of strength as a brace made of plastic.
Window replacement is usually more expensive than fixing just one pane, but it's worth the extra cost for homeowners who are looking to improve their home's appearance and energy efficiency. Apart from replacing the damaged glass, you might also need to do other repairs to the frame and weather stripping. It is important to engage a professional for this type of work since mistakes could lead to drafts, moisture and water damage.
It is recommended to take off the sash before beginning working on your window. This way, you'll get a an easier view of the frame, and it's much easier to work on. To get rid of old putty and wood molding and metal glazing points, a hammer as well as a the heat gun are usually needed.
You'll also have to clean the frame and apply a layer of Linseed to the rabbet prior you install the window. Also, you'll need to measure both the height and width of the opening. Be sure to subtract 1/8-inch off each measurement; this will ensure that the new pane fit snugly and allow for expansion and contraction.
You'll also need to buy an entirely new glass pane and a few Glazier points. It's crucial to purchase high-quality glazing points as they'll play a crucial role in the safety of your window.
Finalizing Up
If you can fix your own window, you could save money on the cost of a professional installation. The task is fairly simple, even though you will require some supplies. The most difficult part is locating the proper ladder for windows on the second story or decorative glass for attics and crawl spaces.
You must remove the damaged glass from its frame. It may be necessary to jimper it off with gloves particularly if the crack is in one of the corners. Be careful not to scratch the frame, which could lead to further problems.
Mix a small amount of dish soap with water, then dip a rag into the solution. Use the rag to clean the cracked area and the surrounding surface, removing fingerprints and other smudges. This helps the epoxy stick to the glass better. After cleaning, let the window dry for some time.
Once the epoxy has cured, scrape off any excess that's risen above the crack. You can also use a rag moistened with acetone to gently remove any epoxy that doesn't want to fall off.
Temperature stress cracks may appear again over time, based on the type of glass used and the climate. If you live in an area that experiences extreme winters, for instance, a damaged window or door could grow larger as the glass expands and contracts. You can avoid this by keeping the interior and exterior temperature at the same level or by putting a plastic barrier between the two.
Some glass repair methods claim to be able to make the repaired crack or chip virtually invisible. However upvc windows repairs near me isn't always the case. The crack will be visible if the crack appears extensive or deep. If you are concerned, consider replacing the window to avoid further issues. A glazier can cut the new glass to the right size for your frame and then carefully install it. This is a much safer option than attempting a DIY window replacement.